Introduction and Design Challenge
When designing a multi-story parking structure, efficiency and safety are the two most important aspects of the design. As you increase the number of parking spaces by increasing the number of levels or increasing the bay span (BayX), these adjustments must change the total material requirements and the usable clear height. [5-7]
The goal is then to identify the parameters that effect the volume of the material required to construct the parking structure which in turn is able to calculate the BOQ quicker without having to design each design option from the beginning. It also effects the clear height, and the number of parking spaces, which is what we want to maximize. The following are the parameters used.
High-Performance Criteria
As this is the main function of the parking structure this is the most important aspect to maximize. I calculated this as the following:
Spaces = NumBayX * 2 * ((BayX – 0.5)/2.5) * NumberofLevels
This gives the actual number of spaces for the whole parking structure (2.5m is the width required for each car, 0.5m is the spacing between each car). [5][7]
Total Concrete Volume [4]
This is calculated through python script as the following;
Slab Volume = SlabThickness * AreaFloor * NumLevels
Beam Volume = BeamDepth * BeamWidth * Length of Beam (total)
ColumnVolume =
Total Volume = BeamVol + SlabVol + ColumnVol
Clear Height [6][8]
HeightClear = LevelHeight – BeamDepth – SlabThickness
Maintaining a clear height of more than 2.8 m ensures circulation comfort and prevents geometric collisions in Revit.
Geometric Parameters
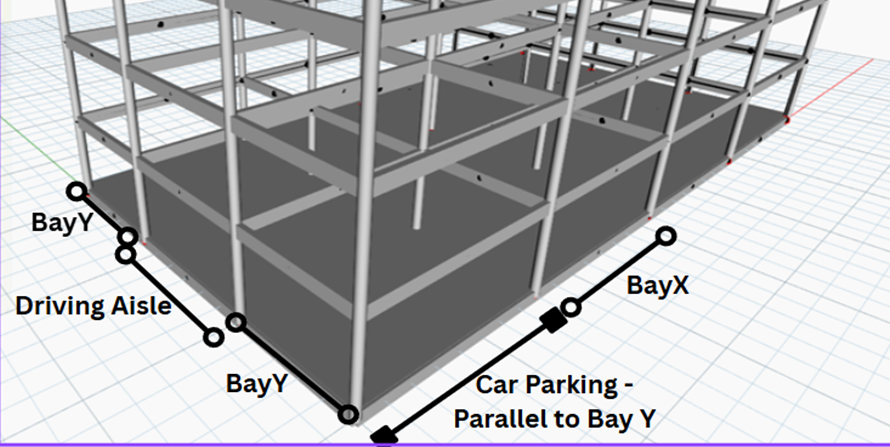
- BayX (5.5 – 8.0 m, 2.5 m step)
This controls the number of cars that will park in each bay, either 2 cars or 3 cars per bay. [5][6]
- BayY (5 – 6 m, 0.1 m step)
5m, is the standard bay depth for cars. However, some parking garages require a deeper bay for the storage of longer vehicles, or the transport of goods (if the parking structure is a part of a mall for example) therefore I left this to the designer.
- DriveAisleWidth (6 – 7.5 m)
This is a two-way aisle; standards require two-way aisles to be more than 5.5m. For the same reason, as before I left it in the designers hands whether they would like to increase the width of the aisle or not.
- NumBaysX
Increasing the number of bays will increase the overall length of the structure, however it will also increase the number of parking spaces.
- NumLevels (1-5)
This has direct effect on the radius of the colums and the depth of beams.
- LevelHeight (3.6 – 4.0 m)
Available Clear Height
Logic of Model
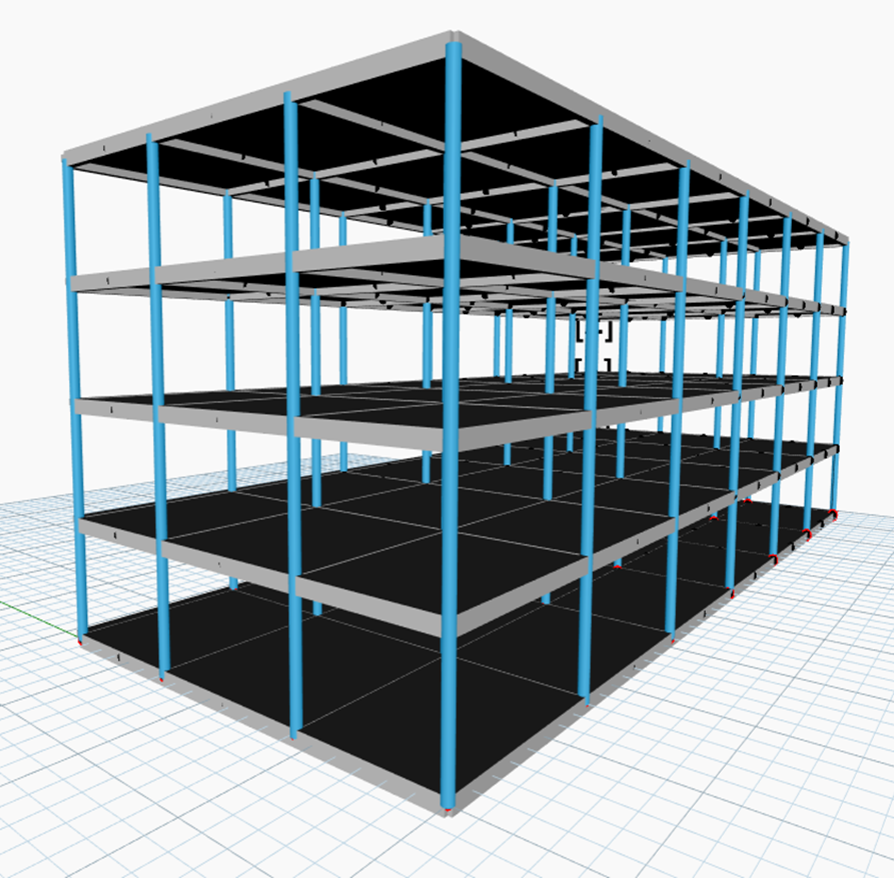
A regular grid is constructed from BayX, BayY and DriveAisleWidth. Longitudinal and Transverse points define the buildings length and width respectively. Vertical lines are then generated using geometry.translate combined with a code block on the number of levels and the height and a vector in z-axis. Columns are placed by connecting each grid point to the point one level above it and I used Cylinder.ByPointsRadius to generate a circular column. The same concept was adopted for beams but on the y and then x directions not in the z direction. Slabs were simpler and where simple cuboids with corner points that were dependent again on the level and thickness of the slab. [9]
Having made multiple python scripts and other code blocks; the model is able to produces the following: BeamDepth, ColumnWidth, SlabType, WidthofBuilding, LengthofBuilding, NoofSpaces, ClearHeight, TotalFloorArea, TotalConcreteVolume, ConcretePerCapacity, and also UsableAisleWidth.
Design Space and Alternatives
The current design space is defined by nine parameters as mentioned before, some are derived from engineering equations and others are entered by the designer. The ranges chosen were based on typical parking-structure dimensions, structural spans and depth rules (beam and column calculations), usability constraints (effective width of driving Aisle, adding 0.5 m as extra width per car), numerical stability (nothing clashes).
Span-Controlled Limits (BayX = 5.5 vs 8.0 m) [1][2][3]
Increasing the Bay results in the following consequences:
- Longer spans require deeper beams (automatically calculated)
- Thicker slabs since punching and deflection rules apply
- Larger loaded area on the columns (also automatically calculated)
Vertical Scaling (NumLevels)
- Total floor area increases
- Slab volume increases linearly
- Beam volume increases linearly
- Column volume increases quadratically [1][4]
Clear Height Constraint
At large spans, thicker slabs, deeper beams, the clear height requirement is not met. This boundary in the design space marks a transition from usable structure to not usable structure. Limit was reached quicker than anticipated in the model which was insightful. [5]
Material Efficiency Range
The total Concrete volume behaves differently depending on the parameters:
- Slab volume grows with plan area
- Beam volume grows with total beam length (BayX or BayY lengths)
- Column volume grows fastest with NumLevels
The most material intensive area is high BayX & high NumBaysX & high NumLevels.
While the most efficient regions is Low BayX & Low NumbLevels.
Design Alternatives
Alternative.1 Material Efficient,
DriveAisleWidth; 6.5m, LevelHeight; 3.8 m, BayY = 5.0 m, NumBaysX = 5, BayX = 5.5 (2 car park per bay), NumLevels = 2.
Outputs: Spaces; 40, total area; 880 m², Total concrete volume; 262.9 m³, ColumnDiameter; 0.344 m, ClearHeight; 3.23m
In the material-efficient configuration, the bending moment in slabs and beams is kept to a minimum due to the short span, therefore, a constant 0.22 m slab is sufficient. Only two levels and a foot area of 880 square meters, the area per column is low. This leads to a total concrete volume of approximately 263 m³ and the lowest concrete per space (6.6 m³ / space for 40 spaces), while the clear height of 3.23m meets the requirement.
Alternative.2 Balanced
DriveAisleWidth; 6.5m, LevelHeight; 3.8 m, BayY = 5.0 m, NumBaysX = 6, BayX = 5.5 (2 car park per bay), NumLevels = 3.
Output: Spaces; 72, total area; 1,633.5 m², total concrete volume; 485.1 m³, ColumnDiameter; 0.35m, ClearHeight 3.24m
A balance between spans and increasing the number of space as the span is unchanged but both the area and story count increases the beam depth and slab thickness remain close to alternative.1. Here the idea is to increase levels to increase capacity but try to maintain a low concrete per space, here it is 6.7 m³/space.
Alternative.3 High-Capacity
DriveAisleWidth; 7.0m, LevelHeight; 3.9 m, BayY = 5.0 m, NumBaysX = 6, BayX = 8.0 (3 car park per bay), NumLevels = 5.
Output: Spaces; 144, total area; 3264 m², total concrete volume; 1027.9 m³, ColumnDiameter; 0.4m, ClearHeight; 3.28m
A high-capacity configuration switches to the long-span module (8m). The span to depth rule increases the beam depth, and the larger area per column (0.39m). The total concrete volume per space; 7.1 m³/space. The highest of the alternatives. So this is not very material-efficient.
References
- [1] European Committee for Standardization. EN 1992-1-1: Eurocode 2: Design of Concrete Structures – General Rules and Rules for Buildings. CEN, Brussels, 2004.
- [2] ACI Committee 318. Building Code Requirements for Structural Concrete (ACI 318-19). American Concrete Institute, 2019.
- [3] Nilson, A. H., Darwin, D., and Dolan, C. W. Design of Concrete Structures. 15th ed., McGraw-Hill, 2016.
- [4] MacGregor, J. G., and Bartlett, F. M. Reinforced Concrete: Mechanics and Design. 7th ed., Pearson, 2017.
- [5] Precast/Prestressed Concrete Institute (PCI). Parking Structures: Recommended Practice for Design and Construction. PCI, 2011.
- [6] International Parking and Mobility Institute (IPMI). Parking Structures: Planning, Design, Construction, Maintenance, and Repair. 6th ed., 2018.
- [7] National Parking Association (NPA). Parking Structure Guidelines. NPA Publications, 2017.
- [8] British Standards Institution (BSI). BS 7346-7: Fire Safety Guidance for Parking Structures. BSI, 2019.
- [9] DynamoBIM. The Dynamo Primer. Available at: https://primer.dynamobim.org/. Accessed 2025.
Main | Introduction | Individual Systems | Integration Context | Combined Ontology | Combined Parametric Model | Analysis and Conclusions | References